Photovoltaic cells, also called solar cells, are devices that create electricity from light. The most common type is made from silicon in a process similar to the way computer chips are made and requires large expensive factories. One possible alternative to silicon cells is dye-sensitized cells, which are less efficient, but are far less expensive to manufacture. The dye absorbs light and transfers the excited electrons to the titanium dioxide. The titanium dioxide semiconductor material separates the charge. The I-/I3- redox couple completes the circuit. In this lab, we will use raspberry juice to construct a simple dye-sensitized solar cell and measure the electricity the cell produces.
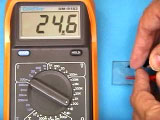
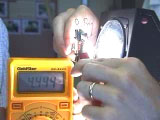
Identify the conducting side of a tin oxide-coated piece of glass
by using a multimeter to measure resistance. The conducting side will
have a resistance of 20-30 ohms.
Starting point 1
Do the next three steps in the spill tray at the the dispensing bench. Do not take the supplies to your own work area.
With the conducting side up, tape the glass to a spill tray using one thickness of tape.
Wipe off any fingerprints or oils using a tissue wet with ethanol. Opposite sides of tape will serve as a spacer so the tape should be flat and not wrinkled.
The optional third side of tape gives an uncoated portion where an aligator clip will be connected.
Add a small amount of titanium dioxide paste all the way across. Push down and spread with a microscope slide before the paste dries.
If you push down the tape serves as a 40-50 micrometer spacer to control the thickness of the titanium dioxide layer. If dry bits get on the slide, use a new slide or portion of a slide. Discard used slides in the spill tray.
Carefully remove the tape without scratching the TiO2 coating. Leave the removed tape in the spill tray for disposal.
Take your coated slide with the tape removed to a hotplate in the fume hood.
Place your glass on a room temperature hotplate in a hood. (The conducting glass is not borosilicate glass so adding your sample to a hotplate that is already hot may crack the glass.) Heat the glass on the hotplate. The surface
turns brown as the organic solvent and surfactant dries and burns off
to produce a white or green sintered titanium dioxide coating. (Note: this requires
a plate that gets quite hot.) Allow the glass to slowly cool by turning off
the hotplate. The sample will look quite similar before and after heating; you only know it is done if you have observed the darkening stage along the way.
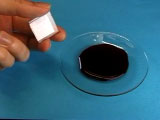
Immerse the coating face down for a few minutes in a source of anthocyanins, such as raspberry
juice. The raspberry juice may be obtained from frozen raspberries.
(Blackberries, pomegranate seeds, and Bing cherries can also be used.)
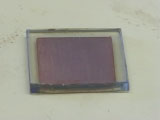
The white TiO2 will change color as the dye is absorbed and
complexed to the Ti(IV).
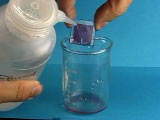
Rinse gently with water to remove any berry solids and then with ethanol
to remove water from the porous TiO2. The ethanol should have evaporated before the cell is assembled. How dry is the surface? (Hydroxyl radical will destroy the dye.)
Starting point 2
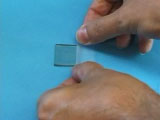
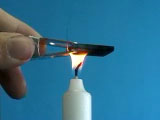
Use a clamp to pass a second piece of tin oxide glass, conducting side down, through
a candle flame to coat the conducting side with carbon (soot). For best
results, pass the glass piece quickly and repeatedly through the middle
part of the flame.
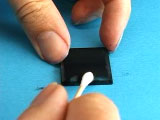
Wipe off the carbon along the perimeter of three sides of the carbon-coated
glass plate using a dry cotton swab.
Assembly
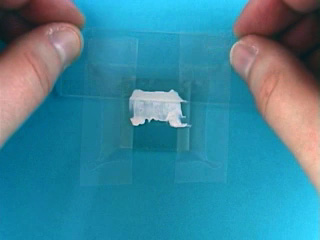
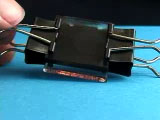
Assemble the two glass plates with coated sides together, but offset
so that uncoated glass extends beyond the sandwich. Do not rub or slide
the plates. Clamp the plates together with binder clips.
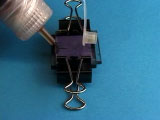
Add a drop of a triiodide solution to opposite edges of the plate.
Capillary action will cause the KI3 solution to travel between
the two plates. (The KI3 electrolyte solution consists of 0.5 M KI and 0.05
M I2 in anhydrous ethylene glycol.) The solution can corrode the aligator clips in the next step so wipe off any excess.
Properties
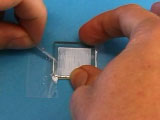
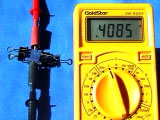
Connect a multimeter using an alligator clip to each plate (the negative
electrode is the TiO2 coated glass and the positive electrode
is the carbon coated glass).
Test the current and voltage produced by solar illumination, or test the current and voltage produced by illumination from an overhead projector.
Gather together most of the cells you and your classmates made. What gets connected to what to produce a maximum voltage? What voltage and current did you get?
What gets connected to what to produce a maximum current? What voltage and current did you get?
Questions
Did your solar cell work? Include the current and voltage (with units) produced by your solar cell in your conclusions. How much power is produced? (energy/time = volts x amps = watts)
What area of solar cell would be needed to produce 1 watt? (Assume the voltage produced is constant and that the current would be proportional to the area of the solar cell.)
How did you assemble all the cells you and your classmates made to produce a maximum voltage? What voltage and current did you get?
How did you assemble all the cells you and your classmates made to produce a maximum current? What voltage and current did you get? Which gives the most power?
Follow the path of an electron through the complete circuit, starting with light shining on the cell, to indicate the function of each part of the solar cell you built.
How could you improve the efficiency of your solar cell?
Materials
A kit that contains the supplies (conductive glass, nanocrystalline TiO2,
binder clips, KI3 electrolyte, manual, etc.) to create five titanium
dioxide raspberry solar cells can be ordered from the Institute
for Chemical Education. The kit contains enough nanocrystalline titanium dioxide to be used many times.
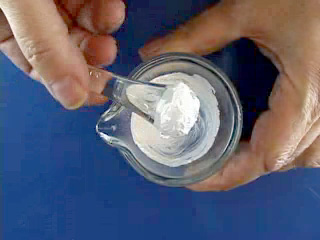
Preparation of TiO2 paste
Grind about 0.5 gram of nanocrystalline titanium dioxide (TiO2) in a mortar and pestle with a few drops of very dilute acetic acid.
Alternate grinding and addition of a few drops of very dilute acetic acid until you obtain a colloidal suspension with a smooth consistency,
somewhat like latex paint. A toothpaste-like consistency is too thick. Also mix in a drop of clear dishwashing detergent as a surfactant.
This quantity of TiO2 is enough for several solar cells.
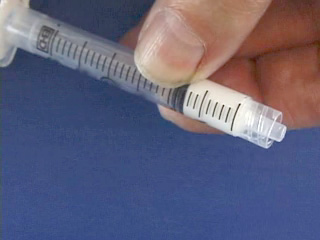
For easier distribution, transfer the TiO2 paste to a syringe. Wrap the end of the syringe with parafilm to keep the paste from drying out when not in use.
(If the paste dries out, the titanium dioxide will need more water. See previous step.)
Using the syringe significantly shortens the class working time, makes for easier clean-up, and gives paste of proper consistency that will last for more than a lab period.
Supplies
Conductive glass from the kitor extra pieces of FTO glass (1" x 1" x 2.3mm TEC 15 glass) from Hartford Glass Co,
735 E Water Street, Hartford City, IN 47348 Phone: 765-348-1282. Arbor Scientific also sells the glass.
Frozen raspberries. The anthocyanin used as the dye must complex with the titanium(IV). Testing a variety of red or blue colored plant material is a possible source for inquiry-based extensions. Blackberries, raspberries, pomegranate, and bing cherries work. Strawberries and red grapes do not work.
Because of general availability and the intense color we use thawed frozen raspberries pulverized in a blender; the mixture can refrozen and thawed many times.
Very dilute acetic acid (0.1 mL concentrated acetic acid in 50 mL of water)