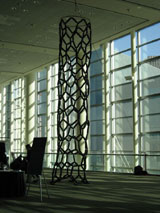
This tutorial does not address the safety concerns associated with suspending a large sculpture, although the hazards are mitigated given that the structure is very lightweight.
Balloons are latex and should not be handled by someone with latex allergies. Balloons are powdered with latex and persons with severe latex allergies can be affected by being too close to balloons while they are being inflated.
Use fresh balloons - order no more than a few weeks in advance.
Balloons deteriorate quickly when exposed to heat or UV light. Minimizing exposure to sunlight and heat sources will increase the lifetime of the sculpture.
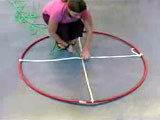
Step 1: Constructing the frame
1. Dura PEX tubing usually comes in 25 ft spools. Cut the tubing into two 12.5 ft pieces; this will be enough for two 4-foot diameter frames.
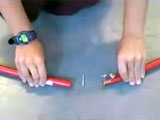
Insert the 1/2" male/male joint into one end of the tubing and drill a hole through both pieces with a power drill about 0.5" from the
end of the tube. Insert the other end of the joint into the opposite end of the tube and repeat.
2. Secure the hoop for the frame with screws and wing nuts. Insert a screw into the hole you just drilled to attach the joint to one end of the tubing. Fasten in place with a wing nut.
3. Attach the other end of the tubing to the joint with the second screw and wing nut.
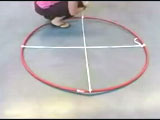
4. Mark out quadrants on the circle using tape or pen. Put a mark directly across from the joint, then put marks halfway between that mark and the joint on each side.
(Alternatively, a hula hoop can be purchased at a local toy store for use as the frame. Balloon Nanotubes made with a hula hoop will have a smaller diameter than the ones featured in this guide.)
Step 2: Preparing the frame for hanging
1. Take a segment of medium rope about 10 ft long. Fold it in half and tie it across the circle at two of the marked points opposite each other. Repeat for the other two marks with another length of rope.
[Optional: the ropes can be duct taped where they meet the frame to prevent sliding during construction.]
Step 3: Hanging the frame
1. Tie one end of the climbing rope to the point where the medium ropes cross. A hangman's knot works well for this.
a. You should consult your building manager about the best way to hang and tie off the sculpture.
Note that the frame will have to be raised several times during construction and the final sculpture will weigh about 10 lb.
b. Initially, the frame should be suspended about shoulders' height from the floor.
2. Once the frame has been hung, adjust it by sliding the medium ropes through the center knot until the frame is balanced and even with the floor.
Step 4: Adding the first ring
1. Inflate Qualatex 350 balloons to 22". The sculpture looks best when the balloon lengths are relatively uniform, so you may want to inflate one balloon to the
desired length and then use the length of this balloon as a template. You will need approximately 90 balloons for every 10 ft of sculpture you want to build.
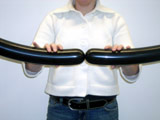
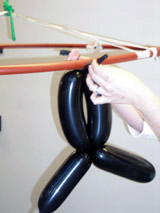
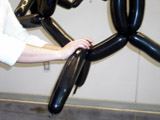
2. To start the first ring, pinch and twist a balloon at its midpoint, forming two links.
4. Pinch and twist the midpoints of the newly formed links, quartering the balloon.
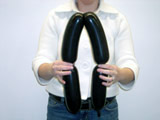
5. Twist the newly-made midpoints together, forming an upside-down “Y” shape.
6. Using a piece of an unused balloon (or a piece of string), tie the twisted joint onto the frame. The upside-down “Y” shape should now be attached to the frame.
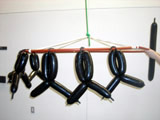
7. Repeat Steps 3-6 to add another upside-down “Y” shape to the frame. Make sure the un-inflated tail of the new “Y” points toward the knot end of the first “Y.”
Continue to repeat Steps 3 through 6 until the upside down “Y” shapes fill the frame.
8. Tie the un-inflated tail of one “Y” point to the knot end of the “Y” next to it.
9. Continue to tie tails to knots until all upside-down “Y” shapes are connected. (The joints created by these knots are “downward-facing” and will be the sites for adding to the structure)
Step 5: Adding to the structure
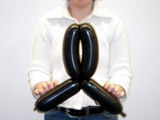
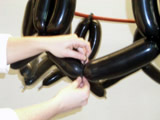
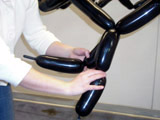
1. Pinch and twist a new balloon at its midpoint. Drape this balloon by the midpoint over a downward-pointing joint.
2. Folding the two halves of the hanging balloon downward over the joint, twist them together at their respective midpoints, forming an upside-down 'Y' shape.
3. Repeat steps 1 and 2 on the next downward facing joint, so that two upside-down Y-shaped balloons are hanging next to each other.
4. Knot adjacent ends of the Y-shaped balloons together, forming a hexagon.
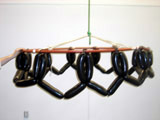
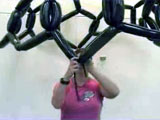
5. Repeat steps 1, 2 and 4 to complete the row. Continue repeating them to add more rows to the sculpture. Raise the structure periodically so that it’s at a comfortable working height. Add as many rows as you wish without letting the sculpture touch the floor. (Grit on the floor can cause balloons to pop).
Step 6: Finishing the structure
1. For the final row, follow steps 1 to 4 above, then stop.
2. The bottom row may need some weight added to look like hexagons. Fill a balloon with a small amount of water and drape over two or three of the downward facing joints to add weight.
Step 7: Clean up
When you are ready to take down the sculpture, lower the frame to the floor. Cut the fishing line and take the sculpture outside to pop, as it can be noisy.
To deflate a balloon with out popping, cut where the balloon is stretched at the ends. Be sure to clean up all the pieces of popped balloon!
1 12.5 ft 1 2 2 1 100 ft 20 ft 1 roll 1 spool 1 pair 2 bags
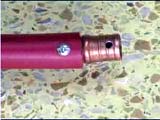
Balloon pump or source of compressed air
Dura PEX tubing, 3/4" OD, 1/2" ID
1/2" male/male joint, plastic or copper
Screws
Wing nuts
Phillips head screwdriver
Climbing/Poly rope
Medium thickness rope (we use 3/8" diameter nylon rope)
Duct tape
Fishing line
Scissors
Qualatex 350 balloons in Onyx Black, 100 ct (available from http://www.tmeyers.com) NOTE: do not order more than 1 month before construction